Choose a detector that matches the refrigerant and the leak-hunt workflow

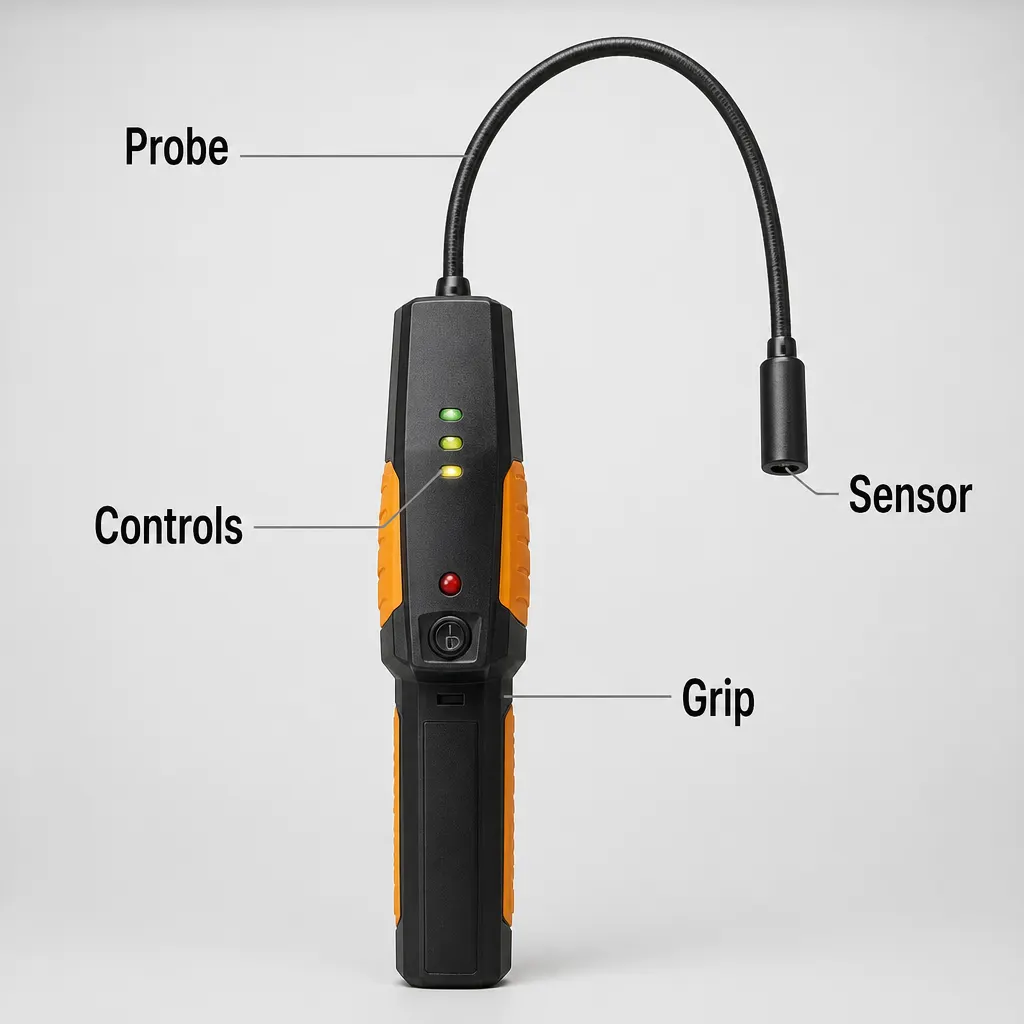
When choosing a refrigerant leak detector UK engineers can use on commercial sites, begin with documented refrigerant applicability, setup and alarm behaviour. The testo 316-3 listing says it detects common CFCs, HFCs and FCs, requires no refrigerant characteristics to be selected before use, and provides visual and audible alarms. It also lists automatic zero setting for work in an already contaminated room. Those points make it relevant to a methodical electronic sweep, but they do not remove the need to check that the refrigerant on the particular cold room, chiller, split system or heat pump falls within the documented groups.
The buying decision should therefore start with the systems in the engineer’s workload, not with a broad promise that one tool will suit every visit. Write down the refrigerants encountered, the usual access conditions and the places that must be inspected. Then compare those requirements with the product information available before purchase. An engineer dealing with repeat loss of charge needs more than a general indication that refrigerant is somewhere nearby: the working method must help narrow the response towards a joint, valve or section of vibration-prone pipework that can become a defined repair target.
Set the search around the cold room or plant area
In a restaurant cold room, supermarket cabinet area or commercial plant space, the search can easily expand if the engineer follows every isolated alarm without a plan. Begin by defining the equipment boundary and identifying accessible joints, valves and sections of pipework affected by vibration. Separate these from panels or concealed areas that will require more time to reach. This creates an ordered route through the installation and makes it easier to explain what has and has not been inspected during a restricted access window.
Background contamination is another practical consideration in an enclosed refrigeration setting. The listed automatic zero function is intended to establish a working baseline where refrigerant is already present in the room. That is useful information, but zeroing should not be confused with proving that an area is clear or identifying the exact source by itself. If the baseline changes as the engineer moves between the cold room, cabinet and plant area, pause and reassess the environment rather than treating every change in alarm behaviour as a confirmed leak location.
Check documented applicability before taking it to site
The product listing for the testo 316-3 names CFCs, HFCs and FCs as detectable refrigerant groups. That is more useful than an unexplained claim of broad compatibility, but the group description still needs to be matched to the refrigerant recorded for the system being serviced. Do not infer coverage for an unnamed refrigerant simply because the equipment is a cold room, air-conditioning system or heat pump. The application label describes the installation; it does not establish detector compatibility.
Also check what the documentation says about preparation and feedback. This model is listed as ready for use without selecting refrigerant characteristics first, and it signals detection through visual and audible alarms. Its listed power source is two D-size batteries. These are concrete points to compare with the job: straightforward preparation may suit a time-limited call, dual alarm feedback can help while the probe is being moved around equipment, and the battery format should be considered when planning van readiness. None of these facts replaces the need to read the operating information supplied with the detector.
Interpret alarms as search guidance, not a finished diagnosis
An electronic response is most useful when it helps an engineer reduce a broad search area to a smaller component or connection. The testo 316-3 has both audible and visual alarm outputs, so the operator can watch and listen for a change while moving through an ordered inspection route. If a response occurs near several adjacent joints, step back from the immediate area, allow the detector to establish a usable baseline as directed, and approach each candidate point separately. The aim is to find a repeatable location rather than accept the first alarm as the answer.
This distinction matters on a recurring loss-of-charge visit. A site manager may reasonably want to know which component requires attention, while a general alarm only indicates that the detector has responded. Record the equipment, the area inspected and the point around which the response was narrowed. If the response cannot be repeated or isolated, describe the finding as inconclusive rather than turning it into a definite claim. Clear limits protect the quality of the service record and help determine whether further access or investigation is needed.
Use a repeatable sequence around joints, valves and pipework
A useful working sequence starts before the probe reaches the equipment. First, identify the refrigerant recorded for the system and compare it with the listed CFC, HFC and FC applicability. Second, confirm that two suitable D-size batteries are fitted and follow the available operating instructions for preparation. Third, divide the cold room, cabinet or plant assembly into sections. Sweep accessible joints and valves in a consistent order, then move to vibration-prone pipework and only afterwards to areas requiring panels or other access work.
When an audible or visual alarm occurs, avoid abandoning the route and searching randomly. Note the section, move away from the suspected point and use the documented zero behaviour as instructed before approaching again. Repeat the approach from a practical alternative direction where access allows, then narrow the search to individual joints or components. Finally, record whether the response was repeatable, where it occurred and which areas were not accessible. This sequence does not guarantee a leak will be found, but it turns detector feedback into a clearer and more defensible inspection record.
Run a van and site-readiness checklist before the visit
Use this checklist as a working object rather than relying on memory. Content check: confirm that the detector, its available operating information and two D-size batteries are present. Compatibility check: identify the system refrigerant and verify that it belongs to a documented detector group rather than assuming suitability. Setup check: understand how the automatic zero function and visual and audible alarms are intended to operate. Environment check: note whether the inspection will take place in a cold room, cabinet area or contaminated plant space where the baseline may need careful interpretation.
Continue the checklist with access and aftercare. Surface and access check: map the joints, valves, accessible pipework, vibration points and panels that shape the sweep, without assuming that concealed components can be reached. Recording check: prepare to note the equipment, search route, repeatable alarm location and any uninspected areas. Aftercare check: consult the product instructions for cleaning, storage and any functional checks; these requirements are not detailed in the supplied product facts, so they should be verified rather than invented. Before the next call, repeat the battery and readiness checks instead of assuming the detector remains prepared.
Recognise the mismatches before buying the testo 316-3
This detector is a poor choice when the required refrigerant cannot be matched to the documented CFC, HFC or FC groups. It is also a mismatch for anyone expecting an alarm alone to identify the failed component, produce a complete service record or replace the engineer’s inspection process. The listing establishes automatic zero setting and visual and audible indication, but it does not provide, in the supplied facts, details about probe dimensions, storage limits, maintenance intervals, replacement parts or a prescribed pre-visit functional-check procedure.
Those omissions matter for a contractor replacing an unreliable detector or equipping another van. If the purchase depends on reaching a particular concealed joint, following a formal maintenance schedule or applying the detector to a refrigerant not clearly covered, obtain the relevant documentation first. Buyers should also avoid selecting it solely because the listed preparation sounds simple. No refrigerant selection is required before use, according to the listing, but simple setup is not the same as universal applicability or freedom from interpretation. A detector should resolve a workflow problem, not become another tool the team hesitates to trust.
Make the next step a documented job-to-tool comparison
Before committing, take one representative job from the service diary and compare it line by line with the documented facts. Record whether it is a cold room, chiller, refrigeration pack, split system or heat pump; identify its refrigerant; list the accessible valves, joints and pipework; and note whether background contamination is likely. Then compare that profile with the testo 316-3 listing: CFC, HFC and FC detection, no need to select refrigerant characteristics first, automatic zero setting, visual and audible alarms, and power from two D-size batteries.
If those facts cover the refrigerant and support the intended search sequence, the next step is to obtain and read the operating and care information before putting the detector into a service van. If compatibility, access, functional checking or upkeep remains unclear, resolve that gap before purchase rather than filling it with assumptions. On site, use the detector to sweep, narrow and document; do not turn a single alarm into a claim that exceeds what was observed. That approach gives the engineer a practical basis for choosing the tool and explaining the resulting diagnosis to the customer.